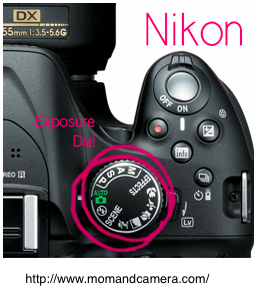
S - Shutter speed priority This mode is used when you’re not quite ready for full manual mode. This mode allows you to manually adjust the shutter speed but automatically adjusts everything else for you. You can use this setting wherever you like, but it is best used where you want to freeze motion. For instance, a bird flying. The mode on a Nikon for Shutter Speed is an ‘S’, and to activate it, simply twist the dial to shutter speed.
P - Programmed Auto Program mode has the camera calculate both shutter speed and aperture. The difference between Program mode and Full Auto mode is that in program mode, only the exposure is automatic, while other camera settings (e.g. shooting mode, exposure compensation, flash) can be set manually; in Full Auto mode everything is automatic. It is a ‘P’ on your dial. A - Aperture priority Aperture priority mode is a setting which entitles you to manually set the aperture, but automatically sets everything else. You can use this setting anywhere you like, and in almost any situation. This mode is best used for creating a shallow or deep depth of field by amateurs who have still yet to understand how to manually adjust the rest of the modes. This mode is simply an ‘A’ on Nikon DSLR’s. To activate it, turn the dial to the ‘A’.
M - Manual mode Manual mode is a mode where you set everything. The ISO, shutter speed, aperture, exposure, everything. This mode is used by professionals and experiences amateurs, as it is a hard mode to master because it requires many precise details based on your surroundings and lighting. You can use this setting anytime anywhere but keep in mind that this mode is hard to master. Play around with it to get the most out of your Manual Mode experience. The mode itself is just an ‘M’ on the dial. As said before, just turn the dial so that the little white dot lines up with the ‘M’.
Close up (Macro) It still lets you alter the shutter speed, however it sets your settings to the approximate settings needed to obtain the best possible macro photographs. The reason that there is such thing as this mode is so that you can equip as much quality out of small objects, and make them appear larger and crisper. People use this mode most whilst taking close-up shots, hence the name. These are such as flowers, dew on grass, ants, bugs, water droplets, and basically anything that is small and creative. Close-up mode is a mode on your dial which looks like a flower.
Auto No Flash In this mode, there is no flash. It does all the same things as automatic, but without flash. This will let you manually decide whether you would like to use flash or not. You can use auto no flash where flash is prohibited, for example in a museum or a theatre. It does all of the same things as the normal auto mode, except without flash. The mode on the dial looks like a lightning bolt with an arrow on the end and it is crossed out in a circle. This should be just below the Auto mode.
Auto Automatic mode is where the camera does everything for you. Not only do you not have to set the settings, but the camera also adjusts the exposure, white balance AND ISO for you. All you have to do is point and shoot. You can use this mode anywhere, anytime, as it does all of the work for you. Automatic mode on the dial is the only green dial. It has the words ‘AUTO’ in capital letters above a green camera. To set this as your mode, turn the dial until the white dot lines up with it.
Moving Subjects This mode is for moving subjects. This mode automatically adjusts the aperture and shutter speed, leaves the ISO on automatic, but lets you slightly alter the shutter speed. Ideally, it will adjust the shutter speed to a very fast shutter, to freeze motion. You can use this setting to capture action shots, or perhaps a child running, or riding a bicycle. You can also take it of a sport to freeze the motion or even of your pet. Whatever the scenario, the moving subjects setting will not fail to impress you and will make your pictures look wonderful. On the Nikon dial, this setting is of a man running. To equip this mode, simply turn the dial until the icon lines up with the white dot on the left side of the dial itself.
Portraits Portrait mode is a setting that is used to soften skin tones, and hair. Backgrounds are blurred and subjects stand out. You can use this setting wherever people are, as portrait mode is based on photography of people. The best situations are in cloudy, overcast or sunny situations. This particular mode on the dial resembles a woman wearing a hat. To use this setting, turn the dial until the white dot lines up with the portrait setting.
Landscapes Landscape mode is where it automatically adjusts the aperture and shutter speed. Ideally it sets the shutter speed to about 1/50th of a second and the aperture hole rather small at about f/9. You can adjust these though to fit your preference. The purpose of the small aperture hole is to have a wide angle shot, deep depth of field, and everything in focus. You can use this landscape setting when there is a scenery shot. The benefits of using this setting is that it does most of the work for you, and gives you an insight as to what settings are appropriate for your particular scenario. The mode on the dial on a Nikon is of a mountain. The mountain is white and has a black background. To adjust your setting to this mode, then turn the dial until the white dot lines up with the landscape mode icon.
Night portrait Night portraiture is taking pictures at night. With night photography, you have to be very precise to get all the settings right otherwise your picture will not turn out just how you wanted it. This setting helps a lot as it does most of the work for you, adapting the settings to your current situations and surroundings. You can use this setting at nighttime, as it makes taking night portraits and photography a whole lot easier. On the dial on a Nikon, the symbol has a face and a star in the top right hand corner. To get to this setting, turn the dial until it lines up with the white dot.
Sleeping faces This camera setting dulls the flash so that it does not wake up sleeping babies or people. It is specially designed so that the features of the person become more smooth and clear. You should use this setting whilst taking baby photography to allow there to be no harm done to the baby’s eyesight or ways of functioning normally. This setting makes almost no noise so using this setting is good where you have to be quiet. On the dial, this mode has a baby or toddler on it. Guide Mode Guide mode is only on certain Nikon DSLR’s. It is an advanced feature that when equipped, runs you through everything you need to know. Perfect for beginners! You can use this setting in any situations where you don’t feel completely confident in, and you feel you need a little bit of help. The word ’GUIDE’ is on the dial. Rotate the dial to this setting and you’re off and running.
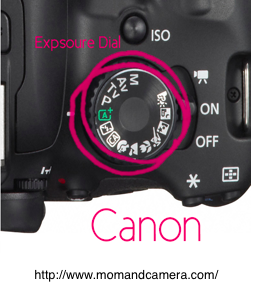
Auto This setting is called the Full Automatic Exposure Mode, and it does just that. It automatically sets everything for you, the exposure, aperture, and shutter speed. You can use Automatic mode when you want the camera to set the Exposure, Aperture, and Shutter Speed for you. Perfect for beginners, this is the easiest mode to set your camera onto. The Automatic button is a little green square with an “A” in the centre and a little positive sign in the top right hand corner.
No flash This is also an automatic setting, however it does not activate the flash if the camera thinks that it is needed. You can use it wherever you want, the same as Auto mode. The No Flash mode is a silver rectangle with a little lightning bolt and a diagonal line running through the back of the image.
Creative Auto This mode is like a cross between Program and Auto mode, as it enables you to easily change the the depth of field, flash, set up single shots, continuous shooting and self timer. It also allows you to take ambience based shots, with the settings: Standard setting, vivid, soft, intense, warm, cool, brighter, darker and monochrome. You can use it anywhere that you want to have greater freedom in your photos with experimenting different moods in pictures. On the dial, it looks like a little rectangle with the letters “C” and “A” in it.
Portrait Portrait is a setting that is used to soften skin tones, and hair. Backgrounds are blurred and subjects stand out. You can use it when you are taking a portrait picture. On the dial it is the head of a girl. Landscape Landscape is a setting that has a wide depth of field (which means that the foreground and background are in focus) and produces sharp images. Landscape mode gives you the prime settings to good landscape photography, but lets you adjust some settings. You can use it when taking landscape photos. On the dial, it is a picture of two mountains and a cloud.
Close up Close up is a setting that allows you to take close up photos, by altering the settings to take the best possible macro photographs. While using this setting, shoot as close as possible to the subject. You can use it when taking photos of small things, for example flowers, insects, water drops, etc... basically any small subjects. On the dial it is a little flower with two leaves.
Sports This setting gives you the freedom to take photos continually with the subject in focus. It has a higher shutter speed that allows it do so. You can use this setting when you want to take images of subjects in motion, like at a sporting match or a waving hand. On the dial it is a little person running in action.
Scene Selection This settings allows you to choose a shooting mode for the scene. The three scene selections that are available (on a Canon EOS 700D) are Night Portrait, which is recommended to use with a tripod to avoid camera shake, Handheld Night Scene, which takes four consecutive shots and can be used without a tripod, and HDR Backlight Control which retains more detail in bright and dark areas of high contrast scenes by taking three consecutive shots. It is shown as three capital letters, which are “S”, “C”, and “N”.
M - Manual Exposure Manual exposure allows you to change the aperture, shutter speed and ISO, as the camera will not do it for you like automatic does. You can use it whenever you want to freely control the aperture, shutter speed and ISO, however it is a hard mode to completely master. On the dial it appears as a capital letter “M”.
Av - Aperture Priority Aperture priority is where you can change the aperture to your desire and the camera automatically sets the shutter speed and ISO. You can use it whenever you want to set the aperture but not the other two manually. On the dial, it looks like a capital letter “A” and a “v”. This stands for Aperture Value.
Tv - Shutter Priority This setting allows you to change the shutter speed as well as the exposure compensation and the camera automatically sets the rest. You can use it when you want to change the shutter speed and exposure compensation but not the other settings, as the camera will do that for you. It looks like a capital letter “T” and a “v” on the dial. This stands for Time Value.
P - Program AE This mode automatically sets the aperture and shutter speed chosen by the camera to complement the brightness of the image subject. You can use it when you do not want to set the aperture and shutter speed and want the camera to do it for you. It is shown as a capital “P” on the dial.